
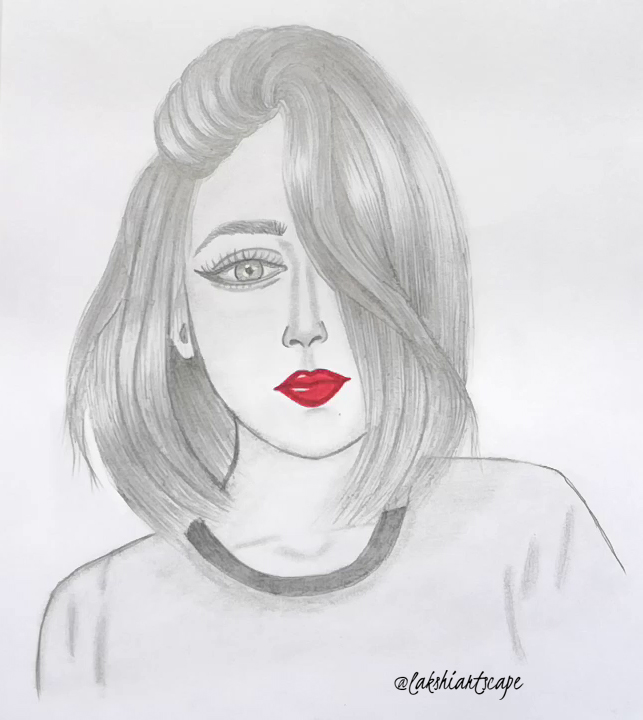
How to draw girl face with Beautiful hair style

Step 1:
Draw a straight center line whichever face view you wanted to draw, means if you are going to draw the face in straight view direction you can draw straight line in the same direction and if you want to draw a face slightly slanting then you can draw straight center line accordingly. Now let’s start drawing the hair outline just which cover the face to draw the face structure.

Step 2:
Now let’s draw 4 lines or you can mark dots whichever you feel comfortable is used a dot here for nose, lips and eyes. Initially I placed a dot for nose and drawn a inverted comma shape on both the sides from the dot for nostril and have drawn C shape curve along both the sides. Then you can shade the inverted comma and now you are done with nose structure. For more details you can checkout my basic Nose drawing documents and videos. Then we can draw the lips by placing 3 dots one for the upper lips and mid line and one for lower lips. You can start from the mid line and then proceed to draw the lower lips and upper lips for more details of lips drawing click here.

Step 3:
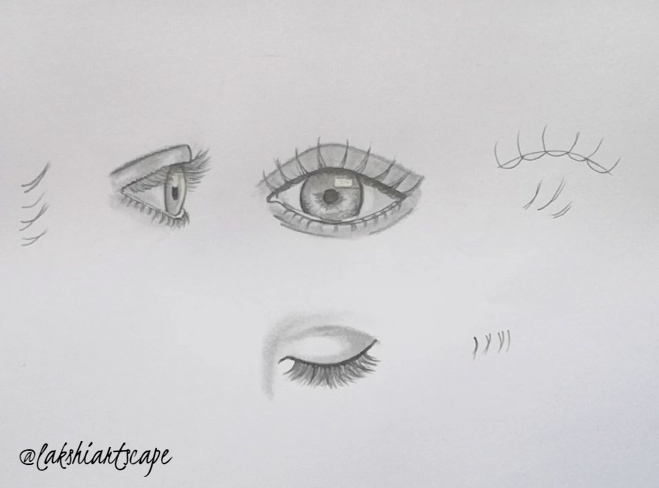
Now let’s start with eyes by drawing the close brackets shape in horizontal direction as upper eye lid and lower eye lid.

Step 4:
Now will draw the pupil by drawing the small circle in the center and shade darker in the upper half and light shade in the lower half so that you will get the realistic eye illusion also mark a small dot round don’t shade as it will give you the light reflection effect .

Step 5:
Here we do lashes for eyes and draw curvy lines above and below the eyes. Do the lashes carefully by marking curvy lines start from the mid line and draw till the left and right side. click here to know more about the lashes drawing ideas. And draw the eyebrows with little strokes using sharp pencil.
Then we can shade the curvy lines we have drawn above and
below the eyes using blending stump or ear buds so you will get the realistic
eye look and also do it for nose by shading from the c shape curve we have
drawn till eyebrows and don’t shade the center of the nose to get the realistic
look for details click here.

Step 6:
Let’s start with hair outline whichever hair look you are going to draw either curvy or straight hair so here I have drawn straight hair.

Step 7:
Draw a L shape curvy line for neck and shoulder and mark 3 lines for neck lines and blend them using blending stump or ear buds and I have drawn round neck T shirt.

Step 8:
Now let’s draw the hair strokes were you have to use sharp
pencil or you can use micro tip pencil so you no need to sharp your pencils
frequently to get the perfect hair strokes. Do the hatching the hair flow
direction and start it with dark shade from the root of the hair with high
pressure and take off your hands in the mid range with light stroke lines and
follow the same in the exact opposite direction that’s tip of the hair. In the
mid hair stroke should be less so that you will get the shiny and soft hair
look. click here for hair stroke reference.


You can access all my drawing
tutorials make sure you bookmark it in your browser and you can even subscribe
to get my updated when I am posting new tutorials.
Like this tutorial
share it with your friends and checkout my videos for more ideas.


0 Comments